As an above-ground swimming pool installer for 37 years and having an above-ground pools group on Facebook with over 400k members, I see a lot of really bad advice on installing above grounds.
As of right now, there still isn’t a good article or Youtube video on how to install an above-ground pool. In reality, there may never be as there are so many variables.
I made a video for Inyopools.com about five years ago on how to install an above ground pool here
In my opinion, it would be impossible to make a completely comprehensive how-to video on installing an above ground. At some point, I will make a better one than what I did above.
Until then, Here are 32 Tips to Make Installing Your Own Above-Ground Pool a Little Easier.
Tip #1 Groundwork is 50% of the Job
This is an important tip because, at first thought, most don’t think about how hard and challenging it will be to get the ground ready to install a pool on.
Knowing that at least half of the job will be working with the earth will reduce early frustration. Take your time prepping the earth. Rushing this huge part of the project is just a bad idea.
Access your future pool site. Is there a big slope to it or is it fairly level. Are there big trees close by? If so, you will be removing a lot of tree roots, which adds to the job for sure.
Oh and don’t make the job a lot harder by adding a hard base material. In most cases, this is not at all needed. You can believe this or not. Some won’t despite the guy telling them this has installed over six thousand pools over a 37 year period.
Tip #2 Figure out How Much Grade Your Yard Has
It will be very helpful if you know how much earth leveling has to be done before starting the project. Learn “How to figure out how much grade your yard has for installing an above ground pool here
Tip #3 Absolutely Remove All Sod
I can’t express how common it is for do-it-yourselfers to want to skip this step. And most who don’t remove the sod and install the pool over the grass (and usually some sand) will wind up taking it back down.
Installing an above-ground pool is a fairly big job. Treat it as one and do the hard work of removing all grass/sod first. This will prevent you from having an off-level pool, a lumpy bottom, and/or having to install it again.
Run into irrigation lines? No problem. Read about it here
Tip #4 Clear and Level at Least One Foot Bigger All the Way Around
When including the frame, an above-ground pool will have a bigger footprint than what its size is. Most models will add 6”-8” for the uprights and top rails.
As an example, a 24’ round pool will take up about 24’, 8” of actual area for the pool and frame. This is why you want to clear and level a bigger area than the pool size.
AREA TO LEVEL FOR THE SIZE POOL
15’ round = 17’ cleared
18’ round = 20’ cleared
21’ round = 23’ cleared
24’ round = 26’ cleared
27’ round = 29’ cleared
30’ round = 32’ cleared
33’ round = 35’ cleared.
Note: Oval above-ground pools need more area cleared because they have buttresses. Buttress designs are different and some “stick out” requiring more space.
Oval pools will require 2ft – 6ft more area cleared (depending on the design) on the straight sides to make room for the buttresses.
Tip #5 Rent a Sod Cutter or Skid/Steer Machine
Removing grass and sod is always harder than people think.
For the first couple of years of me installing pools (in the late 80s), we would use only shovels to remove the sod from the pool site. Yeah, no more. For five years or so, I then owned a sod cutter and it worked well. Later, I graduated to a skid/steer machine and now wouldn’t do a level job without one.
As a one-time DIYer installing an above-ground pool, I think renting a sod cutter could be the best money you’ll spend that year. You don’t have to take my word for it though. Just go out into your yard remove a couple of square feet of your grass (using your homeowner grade dull shovel) and see for yourself.
If your yard has a lot of grade to it or the earth is very hard (clay or rocky), then rent a skid/steer machine. These are also known as “Bobcats”.
Even if you have never operated an earth machine before, it’ll be much easier to get your pool site level and prepared with a skid/steer. A bonus will be that operating the machine will be fun. Well, after you get the hang of it at least.
Tip#6 Rent a Level
Pools get installed all the time using only 4’ or 6’ levels, but it’s a lot harder to level a pool with one.
Using a builder’s level or laser level is ideal because when using one, you’ll be able to only have one point of reference. This is superior to using a 4’ or 6’ level as that method uses several points of reference.
If you don’t know what I mean by “point of reference”, then no problem. Just rent a builder’s or laser level. Your pool will be more level in the end.
Tip #7 Get the Ground Level to Within 2 Inches
After the sod has been removed, your next stage is to level the earth. Before doing anything else, make your install site level to within at least two inches.
You want the pool site to be somewhat level before proceeding. This may seem obvious, but some will start setting the track before the ground is level. And that will make everything harder.
Tip #8 Make sure the Bottom Track is Round
What I mean here is that you want to make sure that the bottom track is shaped correctly. Many round above-ground pools wind up being more “egg-shaped” because they weren’t rounded well during this stage.
If alone, find the absolute center of the pool, use a screwdriver and a rolled-type tape measure. Fasten the tape measure to the screwdriver and stick it in the center. Now measure out to the bottom track and make sure it is even all the way around so it’s a true circle.
If there are two of you, measure across the pool opposite of each upright to make sure the circle is true.
NOTE: Don’t spend too much time getting the track perfectly round. The track will move during the wall insertion, so just make sure that you are starting out nice and round.
NOTE: If the bottom track moved a lot during the wall installation, then you can re-round it with the pool wall up. You’ll do this before you make or install the coving.
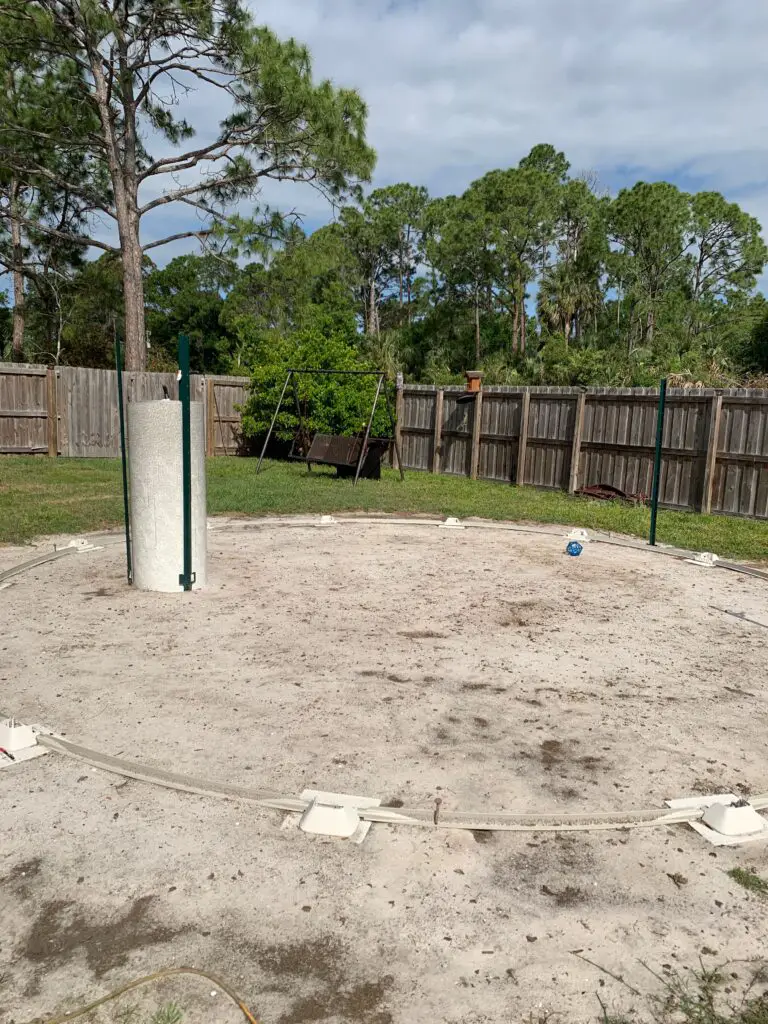
Tip #9 Level the Bottom Track First, Then the Inside
Most DIYers make the mistake of trying to level the entire pool site perfectly first, then set the track down and level it. This is a colossal waste of time.
After getting the site somewhat level (within 2 inches), lay the track down, get it the right shape(round if a round pool), and level it. Level the bottom track by leveling patio stones under each connector plate (where each upright connects).
After you have the bottom track perfectly level, you can now start leveling the inside of the pool. This will be much easier as you’ll be able to use the entire track as a reference point.
Knowitall tip: If you try to level the earth perfectly before leveling the bottom track, then you will have only one reference point for leveling, which is usually the center of the circle. Having the bottom track level will give you a lot of reference points to get the pool’s bottom level.
Tip #10 Try to Get the Bottom Track Measurement Right
The bottom track of a metal-walled above-ground pool is super adjustable. At each bottom connector plate, an adjustment is made by how much of a gap there is between each piece of bottom track.
If you don’t get the measurement of the bottom track at least close to what the length of the wall of the pool is, then it will be a major pain to get the wall to come together later on.
Note: Every pool model is a slightly different size.
As an example of what I mean here is that every 24’ above-ground pool is not exactly 24’ around. Some will be 23’, 11” while others will be 24’, 1”. The actual dimensions of the pool are determined by the length of the wall. And you won’t know what that is until the roll the wall out into the bottom track and then see how long it is.
What I do when I’m not familiar with the model is just get the bottom track as close to the pool size as I can.
Using the same 24’ round example, I will make the bottom track close to perfectly round and close to 24’ in diameter. This should put me at least close to the length of the wall and easier to bolt together when the time comes.
Tip #11 Use Smaller Patio Stones
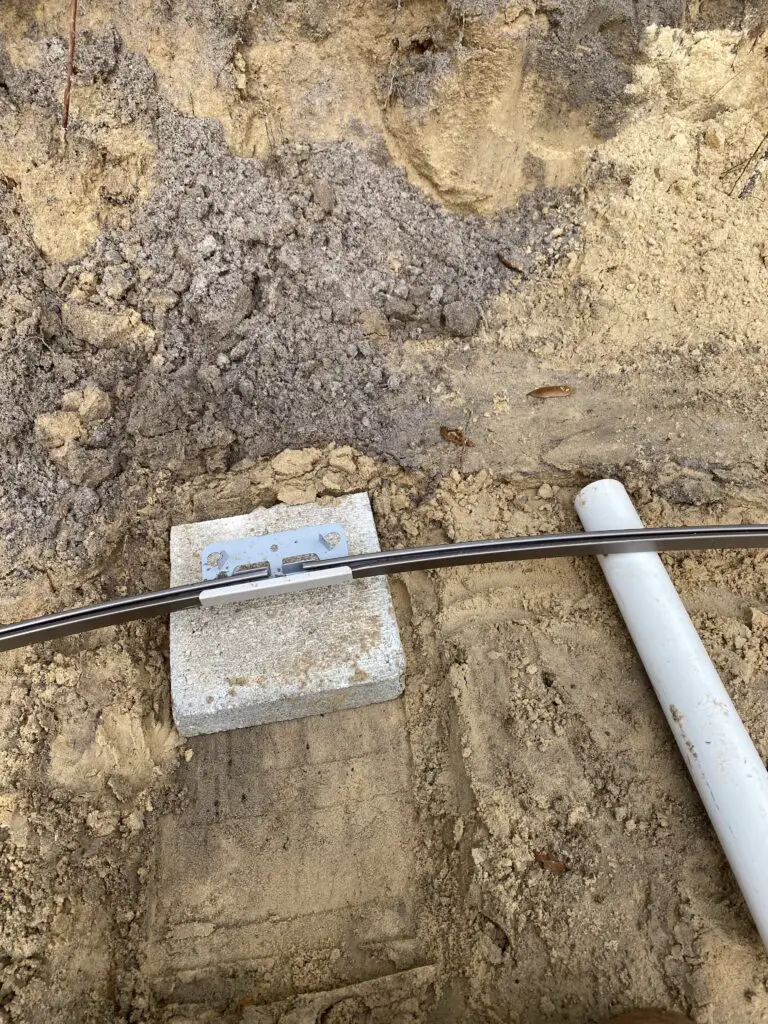
Despite what your logic may tell you, the patio stones that go under each upright has very little structural value to the pool. Most think they need big 12” square stones to go under each upright. You don’t.
Using bigger patio stones or blocks under each upright just makes for a more difficult job. The reason – Because bigger blocks need to be leveled front to back and side to side, smaller blocks do not.
If you use big patio stones and they are not level, then the pool wall may ultimately not come out as level. This is because the bottom track of the pool may (and usually will) move during the wall insertion. And when the track moves front or back from its original spot on a bigger, off-level patio stone, then the wall will ultimately be more off level.
Using smaller blocks will be much easier to level and the pool’s wall will ultimately be better shaped and more level (especially if you have issues with installing the wall).
Tip #12 Don’t Use Too Much Sand
This is a very common DIY occurrence. People use way too much sand when installing an above-ground pool.
This isn’t all the fault of the do-it-yourselfer as many installation manuals give recommendations for using too much sand.
HOW MUCH SAND TO USE DEPENDS ON YOUR GROUND
In Central Florida, where I install pools, I very rarely have to use any sand at all. This is because the earth there is already mostly sand-based. Adding sand to already sandy earth will only result in a pool bottom that is too soft and “footprinty”.
In many areas where the earth is very hard, a thick layer of good clean sand is absolutely necessary for final leveling and making the bottom smooth.
If the earth has a lot of roots, rocks, construction trash, or was a former burn site, then you’ll need more sand to cover all those things in the earth that you may feel or can come through the liner.
If you are not sure about how much sand to get, you can always order a lot of it and use only what you need depending on your earth. The rest can go around the outside of the pool or be used elsewhere in your yard.
Tip #13 While Rolling Out the Wall, Attach the Uprights and Secure Them With Clips
This is a big tip for installing the pool’s wall.
Most directions and videos will have you roll out the wall of the pool with no mention of how to keep it in place. Some will have you using stakes, strings, and hooks or a number of things to keep the wall up and in position.
In the real world, many will recruit friends and family to just hold the wall up during the rest of the install. This rarely goes well as the wall has to stay up unsupported for a really long time, and people can’t just stand there for hours holding on to the wall.
Layout your uprights ahead of time and as you roll the wall out and into the track, attach each upright as you go. Put a big spring clip on top of each upright which will clip to the wall.
Also, while rolling out the wall, temporarily attach the top stabilizer bars to the top of the wall. This will give the wall its shape and provide a lot of top support.
This is the best way to keep the wall secure during the rest of the install. The uprights attached to the bottom track and at the top (using the spring clips) will help keep the wall up. And the top stabilizer bars will give the wall top strength and help keep its shape.
Tip #14 Do Not Roll the Wall in the Wind
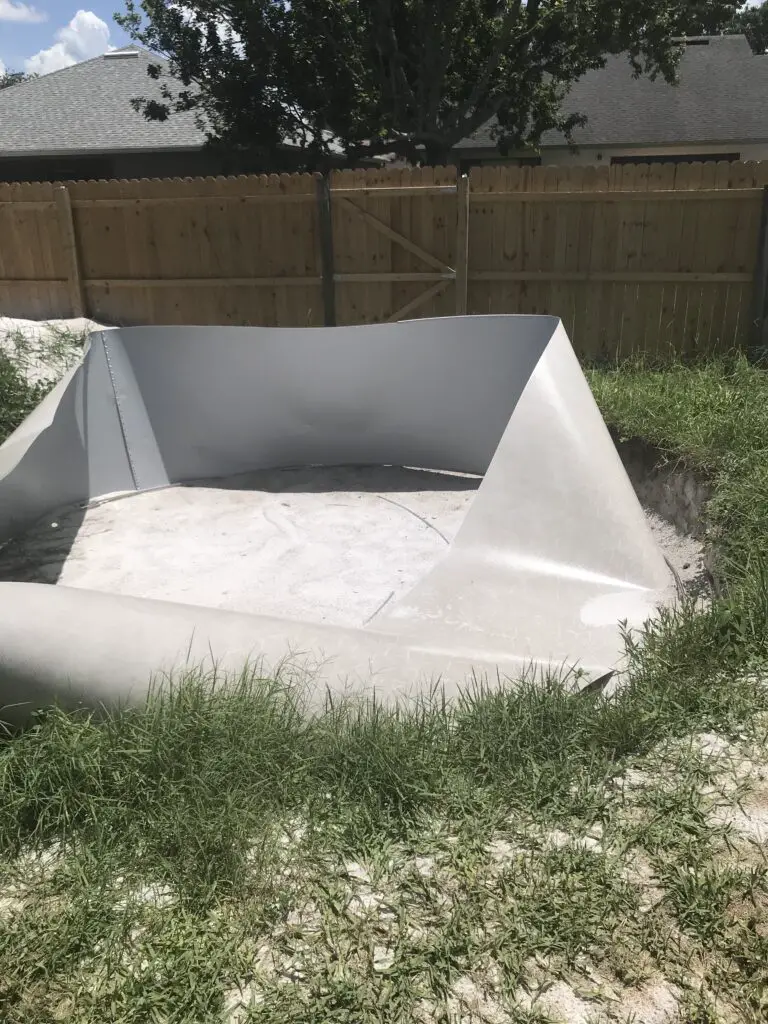
For many DIYers, rolling out the wall is the hardest and most stressful part of the install. This is because the wall won’t be secure for a portion of the install and is at risk of falling down.
To make this part of the project as low stress as possible, DO NOT roll out the wall when it’s windy!!! Even though we have never met and don’t know me, please take my word for this.
In many areas, it’s not as windy in the early morning. If this is the case where you live and you are ready to roll out the wall, wait until the morning. And make sure you have at least a couple of hours of little or no wind so you have time to can get the job done.
Tip #15 Use Bungee Cords and Stakes if you Want to be Safe
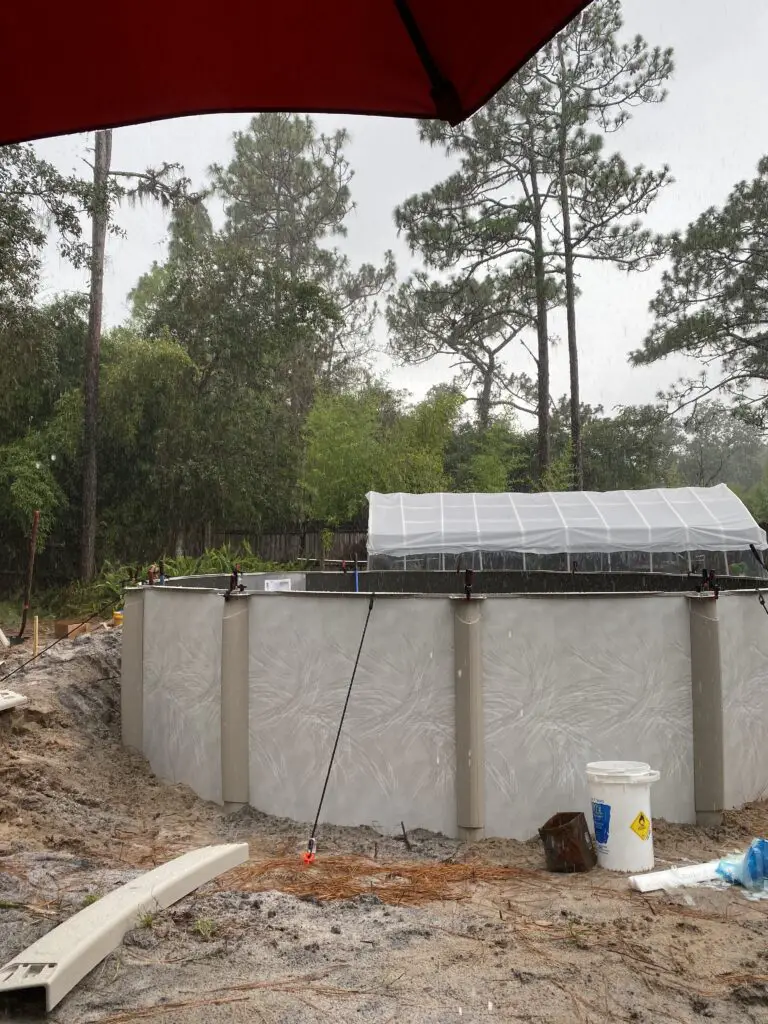
Keeping the wall up and in place can be tough and highly stressful. In addition to securing the wall by its clipped uprights and top stabilizer bars, you can also use some bungees.
I keep eight plastic stakes and bungee cords with built-in hooks at the ends just in case I have too much wind during the install. You can use wood stakes, string line, and hooks for the same thing, but I like bungees because they can give a little in the wind, which helps.
Attach the bungees to the top of the pool in various places. Pound the stakes in the ground on the outside of the pool. Make sure the bungees have the proper amount of tension when connected to the stakes. Too much or too little is not good.
Tip #16 Use something Hard to Roll the Wall On
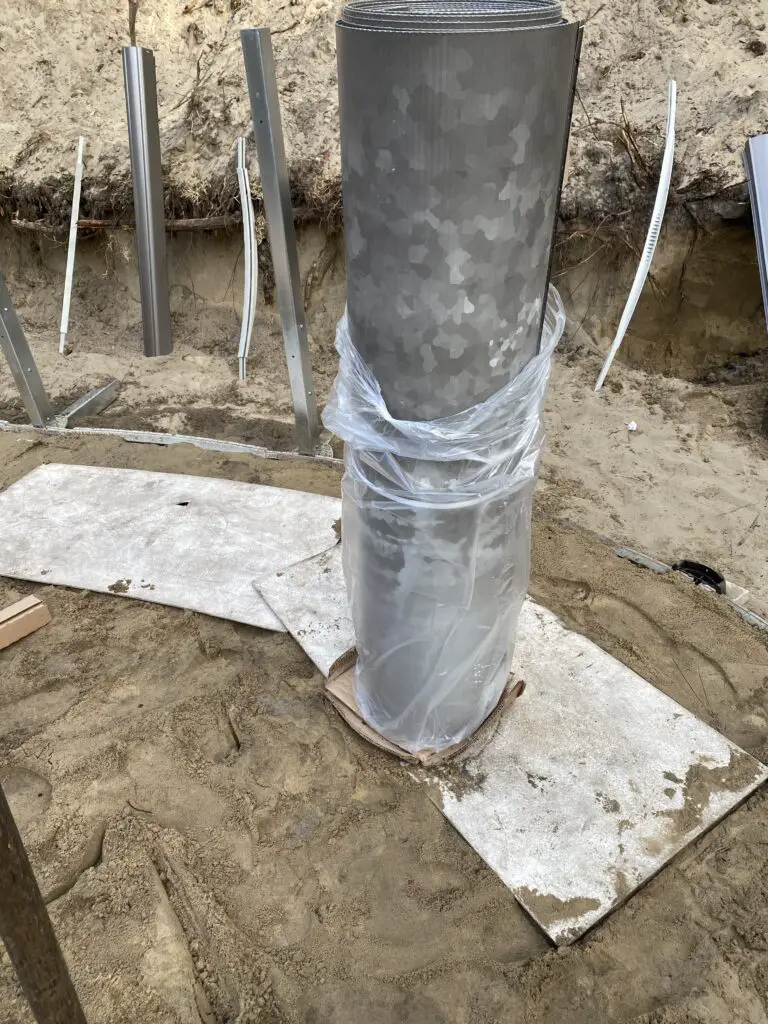
The pool’s wall comes coiled up and will need to be unrolled as you insert it in the bottom track. This means that the wall will be moving around the inside of the pool as it gets installed.
The wall is the heaviest part of the pool. It will not like to move directly on the earth or sand. It’s best to have two pieces of a hard surface that you can roll out the wall on.
I use two – 2’x4’ pieces of thin plywood for this but used just use the cardboard from the pool boxes for years. You want two pieces so you can replace them on the earth as you move the wall around the pool during its install.
If you don’t know exactly what I mean here, you will when you try to roll that heavy pool wall in the dirt/sand.
Tip #17 Expect That the Wall May be Long or Short
When you laid out the bottom track, you probably noticed that there was a gap in between each piece (at each connector).
The bottom track is very adjustable, but the pool wall is not. This usually results in the bottom track either being longer than the wall, or shorter. So, when you roll the wall into the track, you will often find that the wall is longer than the track or shorter.
Since the wall of the pool is not adjustable and absolutely must be bolted together, you will have to adjust the length of the bottom track to make it fit.
To explain how to fix this issue, read “Help! My Above Ground Pool Wall is Too Short”
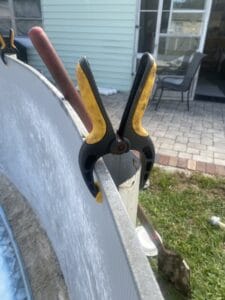
Tip #18 Duct Tape the Wall Bolts Inside the Wall
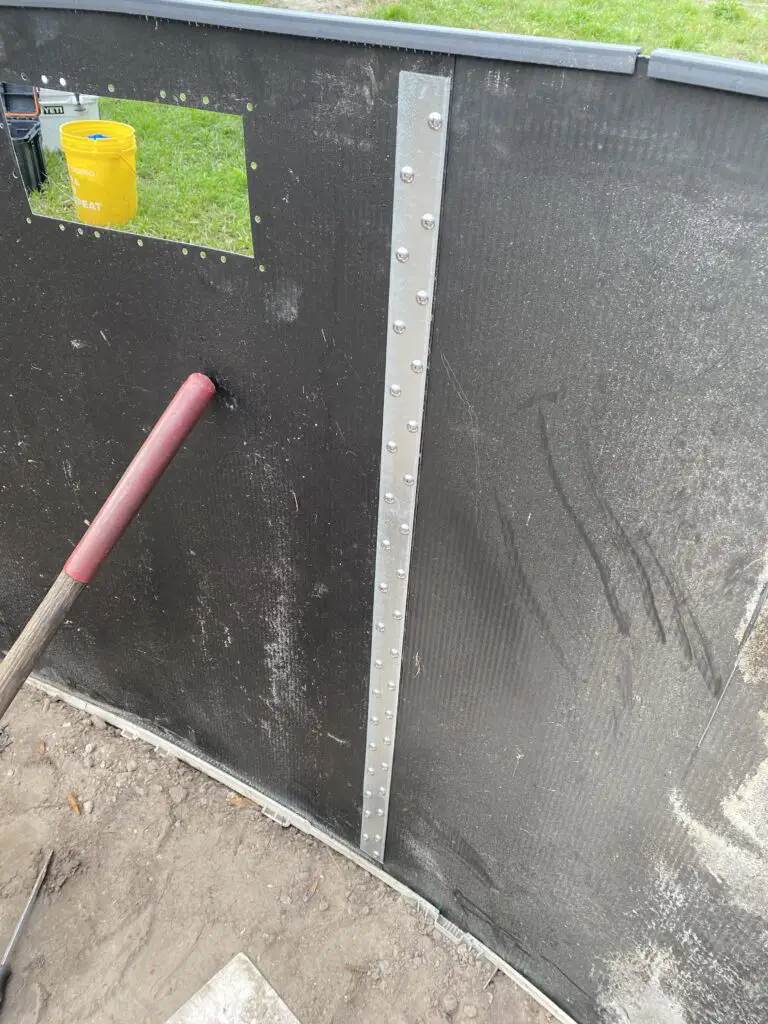
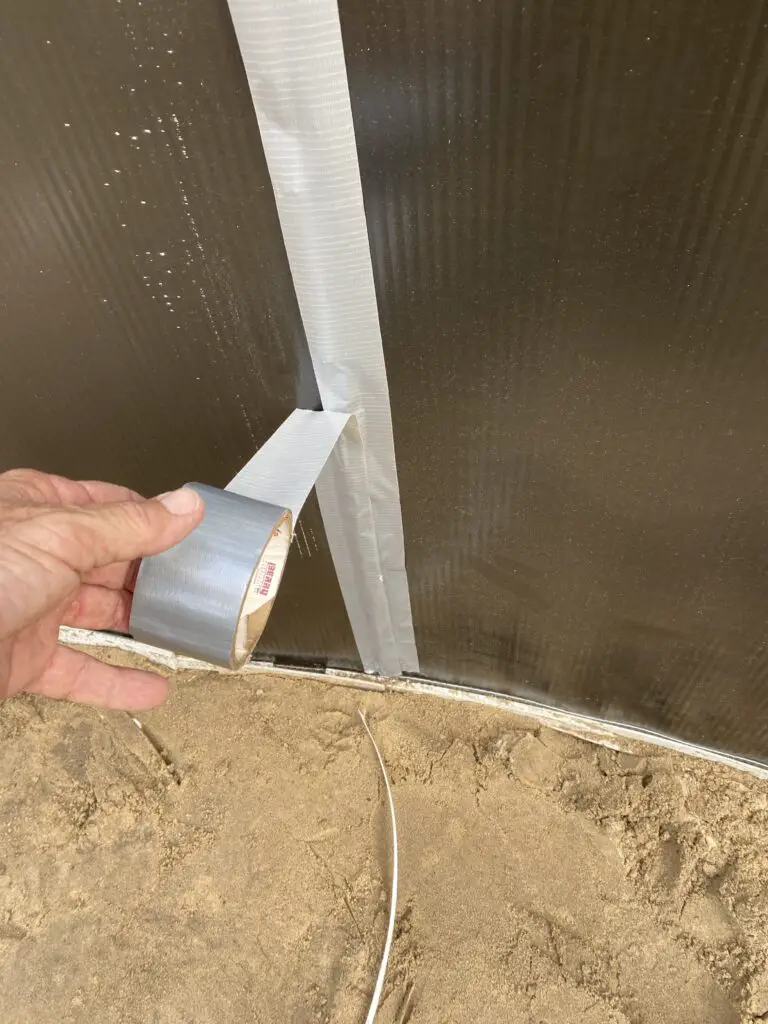
When the wall is in place and bolted together, you’ll want to make sure the bolt heads inside the wall don’t damage the liner later. Using duct tape over the bolts is the best way. Some will do stuff like tape a strip of cardboard or something unnecessary.
Just tape two layers of duct tape over the bolted area from top to bottom and you’ll be good.
Tip #19 Use a Ladder to get In and Out of the Pool
When the pool wall goes up, it will be hard to get in and out of the inside of the pool. Don’t try to jump out or stack anything makeshift that is not sturdy.
You’ll be most likely getting in and out of the inside of the pool a few times, so have a sturdy ladder so you don’t have to worry about it. The wall of the pool is extremely unstable and higher than you think. Be safe and have a good ladder.
Tip #20 Don’t Bother with Wall Foam on a New Pool
I get it. You are getting a pool and want to get everything you can to make it as good as it can be.
I am the same way, but some things are just a waste of money. Purchasing and installing wall foam on a brand new pool is just that – a waste of money.
You’ll find my detailed opinion by reading my article on “when to buy wall foam”
Tip #21 If Using Foam Coving, Bring Sand or Earth Level with the Track and Lightly Tamp to Make Sure it’s Not Too Soft
Foam coving has become a popular add-on for above-ground pools. If you don’t know what this is, Learn about foam coving here
Foam coving is nice, but you want to make sure the ground directly underneath it is firm.
Tip #22 Use a Wide Landscape Rake to Help Smooth and Level
In the world of leveling earth, the wider the reference point, the better. What I mean is that a wide rake will make the ground smoother and more level than a small rake will.
Using a wide landscape rake (3’ wide or so) will make your pool bottom nicer.
Tip #23 Water Down the Earth to Remove Air
Despite how difficult people (especially builders of other things) make prepping the earth for an above-ground pool bottom, it’s really fairly simple.
When trying to make an area of earth or sand flat and smooth, a good thing to do is remove some of the air in it. You do this by wetting it down.
Rake out and then smooth out the bottom of the pool, then wet it down. Repeat this until you feel that you really can’t make it any better. Sometimes I will wet down a pool bottom 4 -5 times before I feel I’ve got it as smooth as it will be.
Tip #24 Find and Apply a Granular Nutgrass Killer
Nutgrass is about the only thing that will grow through a pool’s liner. Learn more about nutgrass here
Many don’t know about nutgrass. It’s not in all areas or yards but worth investigating as you want to avoid it growing through your pool’s liner.
Tip #25 Install the Liner Guard Directing Under the Liner. Don’t Bury It
A liner guard has become very popular with above-ground pools.
Also known as a Gorilla pad, Rhino liner, Elephant pad, and liner pad, this is a blanket type of protector that goes under the liner during installation.
These products are all about the same and do offer some degree of protection from something sharp left in the earth going through the liner.
Some will bury their liner guard down into the earth some and then cover it with dirt or sand. Then they will install the liner. This is not the ideal way to install a guard.
If you have a liner guard, make your bottom as smooth and debris-free as you can, then install the guard/pad. After that, install the pool’s liner directly on top of the liner guard. This will give maximum protection and make it much easier to re-smooth the pool bottom during future liner replacements.
Tip #26 Install Liner in the Sun (if Cooler Outside)
Liners come tightly folded in a box. They can be harder to unfold and lay in place when it’s cool out. So, if it’s a little chilly, wait until you have a nice bright cloud-free day.
Also, all liners aren’t the same size. Believe it or not, some are much smaller than others and will fit very tightly. If your liner just happens to be a tight-fitting one, then it is very helpful if the liner is warm or hot during installation. A warm sunny day will heat the liner up nicely.
Conversely, installing a tight liner on a cool overcast day can be extremely difficult for someone without a ton of experience. Avoid this if you can.
It’s really nice to install during the off-season when it’s not so hot, so consider that as it’ll be an easier DIY job without brutal heat.
Tip #27 Find the Round Seam and Set it in Place Based on That Seam
Every above-ground pool liner has a seam that attaches the bottom piece of vinyl to the wall piece. This seam should be set even along the wall of the pool.
Unfold and lay out the liner inside the pool and find the round seam. Set the bottom of the liner in place based on that round seam. Then start to hang the liner on the wall of the pool. Use the clips that you have the uprights still clipped to (See above #13). Temporarily clip the top of the liner to the wall all the way around.
Now that the liner is somewhat in place and the sides are clipped to the wall, find the round seam and adjust to make it even to the wall all the way around. You are now ready to fasten the liner to the wall and add water or set up the vacuum.
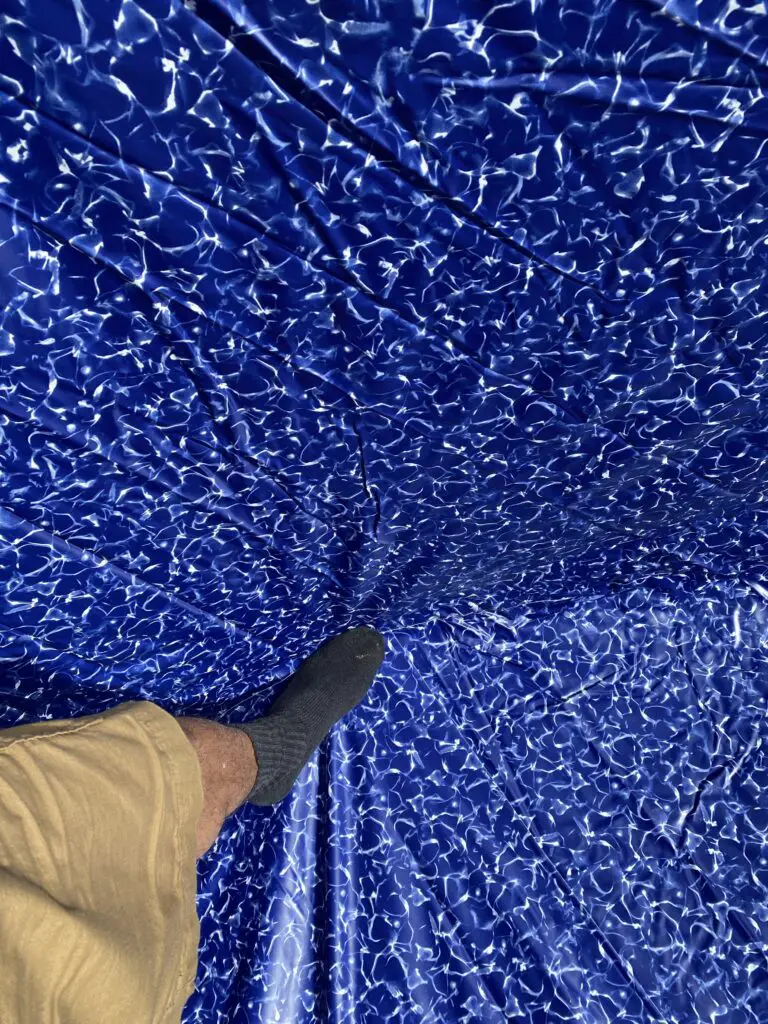
Tip #28 Use the Vacuum Method or Use Water to Get the Wrinkles Out
There are two main ways to make the liner wrinkle-free. One is by using the weight of the water to pull them out while filling. The other is to set up a shop vac between the liner and wall to suck the liner in place.
I haven’t used the vacuum method very much in the last 30 years as it takes too long. But I recommend this method of getting the wrinkles out for DIYers as it requires less knowledge.
Tip #29 When Attaching the Top Connectors, Make Sure Each Upright is Level
Once the liner is in place and has enough water in it that it can’t move, it’s time to attach the top connectors.
Some top connectors go on tight. This means that you can’t move them much later on (during top rail installation). This is then a good time to make sure that your uprights are level.
Take a torpedo level and adjust each upright just before attaching the top connectors.
Tip #30 Top Rails May NOT Go on Perfect. Make Holes if Needed
This is a big tip. Most will stress and wrestle in trying to get the top rails on perfectly. Yeah, no. Most won’t go on perfect.
About 30 years ago, I was installing a lot of Doughboy pools. Now, Doughboys are not my favorite as they are unnecessarily difficult to assemble. End of rant.
Those early Doughboys (and still some today) had all of these different holes in the top rails, and each hole had a number next to them. This was to tell you which hole to use depending on the size of the pool.
Now, trying to use the holes that I was supposed to use to attach the Doughboy top rails was nearly impossible, but I had only installed a couple of hundred pools at that time and didn’t know any better. So I would swear and pull and cus and do all I could to use those holes. After a while, I realized that I could use any holes I needed to make it work and go together.
Here’s the Reality of the Situation
Each top rail needs four screws to attach to the top connectors (2 for each end). Where it screws together is only based on how the top caps go together as they are what hides everything and is the finished look.
As an above-ground pool installer of more than 6,000 pools over a period of 35 years, I know what I am doing. And even with that, I sometimes have to use self-tapping screws to make my own holes. I also occasionally have to cut a top rail or two with a saw just to make them fit.
Certainly, install errors can make top rails not go together properly. But often, the problem is in the design and manufacturing of the product. Don’t think that just because companies like Doughboy and Wilbar have been around for decades making the same thing, that their product is well-engineered. Many are not.
So don’t beat yourself up if things don’t go together well. Do the best you can but get it together and finish the install by doing whatever it takes.
Tip #31 Wait Until the Pool is Half Full Before Installing the Skimmer and Return
As a pool installer, I’m looking to get the job completed and leave. As a DIYer, you have plenty of time.
Wait until the pool is half full before installing the skimmer box and return fitting and cutting the holes for them. When the pool is half full of water, the liner is set, so installing these two components has a much less margin for error.
Tip #32 Do Not use Any Silicone or Anything for the Skimmer
The skimmer has either a one-piece or two-piece gasket. It is not designed to need anything else to make a perfect and lasting seal.
Using silicone or plumber’s putty or anything else will often result in a mess and a leak. Yeah, don’t do that.
There are instances where silicone has to be used with a skimmer install, but not often. Some very poorly made skimmers (usually from China) may not line up well with the holes in the pool wall. Cheap skimmers can also come with very poor gaskets that won’t fit right or lay correctly.
In these cases, an experienced guy like me may elect to use silicone, but I will usually try without and only use it if it leaks. This is how little I use it.
If you don’t want to hear this and/or have your reasons and are going to use something, then fine and good luck. At least make sure it’s 100% silicone and the label says something like “for baths and kitchens”. Get the good stuff.
OVAL ABOVE GROUND POOLS ARE VERY DIFFICULT TO INSTALL
This article is mainly tips for installing round above-ground pools. Ovals are a different animal altogether and require a lot more work and knowledge. Many of the above tips will help you with installing an oval, but just know that they are a challenge to install.
It’s interesting to know that most don’t think about how hard and challenging it is to get the ground ready to install a pool. My sister will have an above-ground pool installed in her home for her kids to play in. I’ll share this with her since it could help with the plan. Thanks!
I just bought a 16 by 32 ractigal pool going to try putting it up my self, and help. Never put one up before.