Having a leak in a swimming pool is never fun. In most cases, pool owners only know that they are losing water in the pool. They first have to figure out if the water loss is from evaporation or a leak. It’s a time-consuming process.
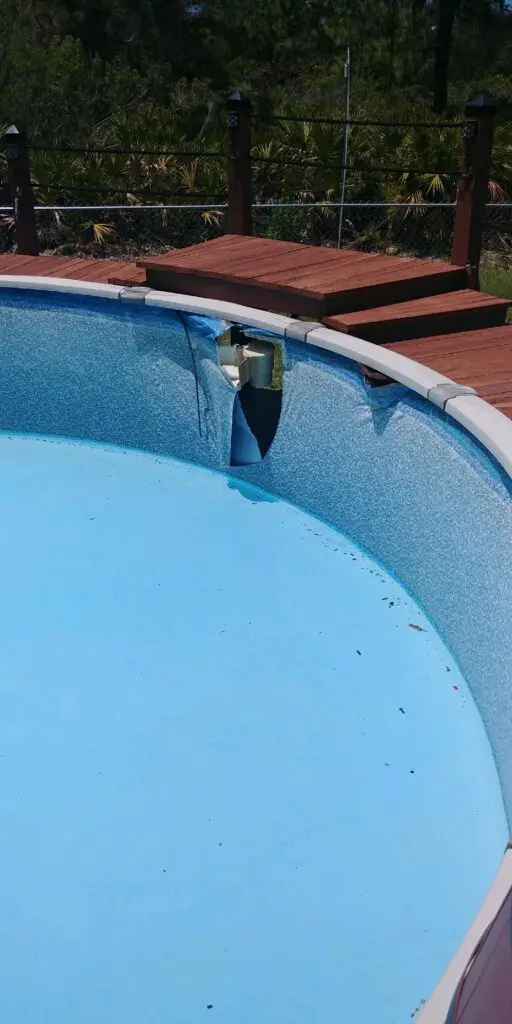
Sometimes you can see where the pool is leaking and although that sucks, it’s much better to at least know where it is so you can fix it. With above-ground swimming pool owners, it’s more common to see the leak. And that leak is very commonly at the skimmer.
In most cases, an above ground pool’s skimmer is leaking because the gasket/s isn’t positioned properly. This means that the skimmer should be removed and re-installed making sure the gaskets are set right and making a seal all the way around. Skimmer leaks should never be repaired by only sealing it from the outside. This is only a temporary and incorrect fix.
AT THE SKIMMER IS THE MOST COMMON PLACE AN ABOVE GROUND SWIMMING POOL LEAKS
If your above ground is leaking at the skimmer, don’t fret much. It’s fairly common. And it can happen to anyone. As a 35 year veteran of installing pools, a leak at the skimmer is by far the most common place that I will get a leak with my installation.
My leaking skimmers are always the result of a poor product, but there are other reasons.
REASONS A SKIMMER MIGHT LEAK
To better understand how to fix a leaking skimmer, it may be helpful to understand the reason why it might be leaking. Here are the most common scenarios:
1 The gaskets weren’t set in place properly
An above ground pool skimmer will come with either a one-piece gasket that is u-shaped and covers the inside and the outside of the pool’s wall, or two identical gaskets with one on the inside and one on the outside of the pool.
These gaskets have pre-made holes in them for the screws and are designed to line up with the holes in the skimmer box, faceplate, and the wall of the pool. With some of these gaskets, the holes may line up well, but the gasket won’t sit evenly all the way around the opening. When this happens, the skimmer can leak.
2 The skimmer screws aren’t tight enough
Most above ground pools now have what is called a “wide-mouth” skimmer. This wider skimmer has eighteen screws that connect it to the pool’s wall around the opening.
It’s important to get these screws on tight. Why? Because if the screws aren’t tight enough, a good seal won’t form around the opening and the skimmer will leak.
3 The screw holes are stripped

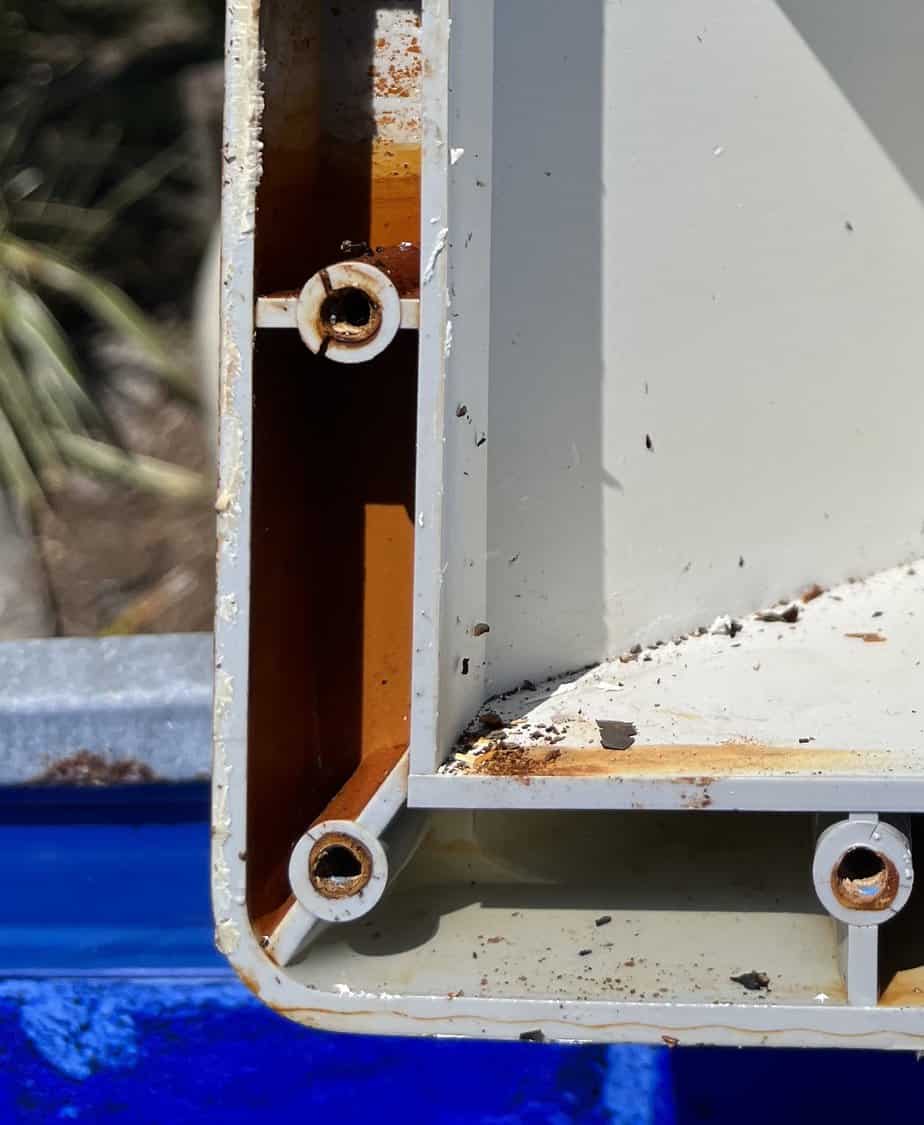
Skimmers are made of all plastic. This means that the metal screws are screwing into plastic holes. And that can mean that the plastic around the holes can break from screwing in too tightly or crack with age. This will result in the metal screws stripping and not being able to grab the skimmer box tightly enough to make a good seal.
When you installed the skimmer, did some of the screws just keep spinning and not tighten? Yeah, that means those holes are stripped.
4 The existing gasket is old and poor
When replacing the liner in an existing above ground pool, the skimmer always has to be removed. Most of the time, the existing gaskets can be re-used as they have already had a good seal and you can re-install it with the same seal.
Some old gaskets will tear when taken apart or cannot be re-used because the material it’s made of has gotten soft or broken down in some way. Some will think the old gaskets are good enough and re-install with them and the skimmer leaks.
5 The skimmer and/or gaskets were poorly made
This has become more common in the last five years. Some skimmers are made very cheaply or poorly, so they won’t line up right with the wall opening. Some gaskets are made with a cheap material that won’t lay well against the wall flat, or their hole pattern just doesn’t line up well with the pre-made wall screw holes, and it leaks.
6 There is some hardened sealant in the way
When changing liners for these above ground pools, I’ve come across a lot of messy and “gooped up” skimmer installations. When the skimmer was installed, someone thought it was a good idea to add some cheap version of a silicone or plumber’s putty all in and around the skimmer.
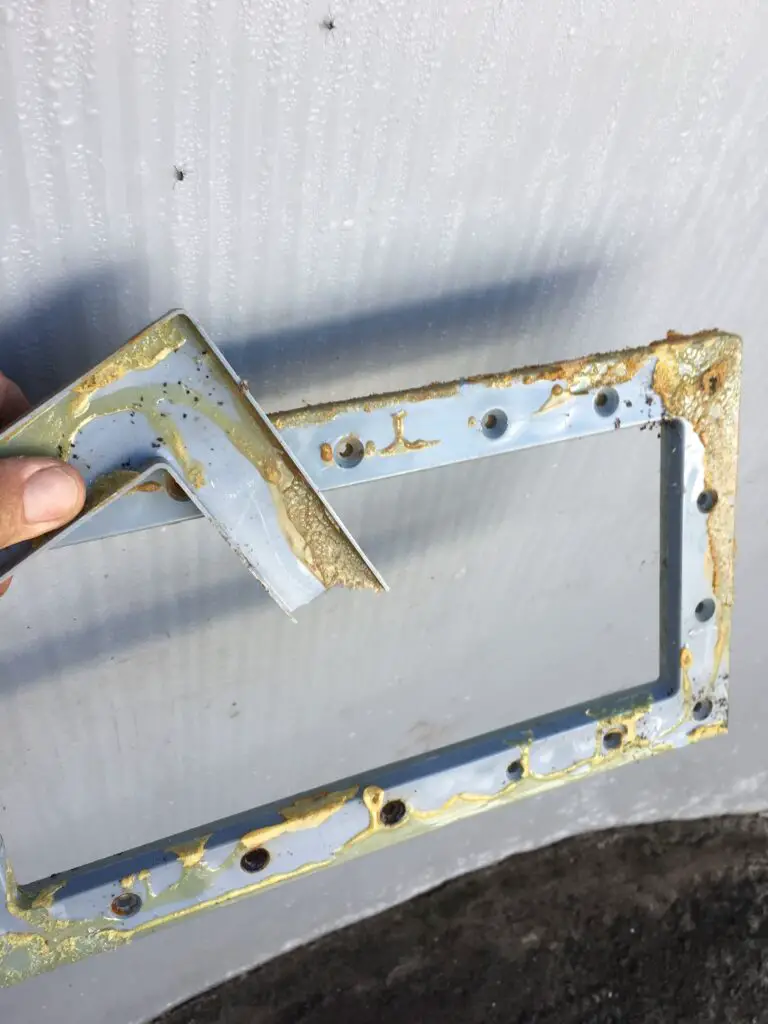
Adding lots of cheap sealing product around a skimmer installation is amateurish, unnecessary, and usually ineffective. It can also get in the way of making a good seal later on when the skimmer has to come apart and be re-installed.
The area where the skimmer is attached to the pool’s wall has to be clean, flat, and clear of anything that may add depth and get in the way of making a nice flat seal.
ALL SKIMMERS ARE NOT MADE EQUAL
It’s important for me to tell you that your skimmer might be leaking and it’s not your fault or the fault of whoever installed it. It might just be a poor quality skimmer!
Unfortunately, skimmers are something that a business guy can have made over in China by some manufacturer that has never made them. They will receive some specs from somewhere and then give a cheap price to make ten thousand of them and have them shipped over to the US.
Now, this Chinese made skimmer will make it over here, get sold with a new pool package, and then a guy like me will be the first to actually install it on a pool. And it will be at this very late point that everyone will realize that the skimmer is poorly or cheaply made and is a leaking piece of shit.
ONE OF MY CHEAP SKIMMER STORIES
Seven years ago, I was installing above ground pools for a local retailer. Now, the two guys who own these stores are nice enough guys, but they didn’t listen to me when I advised them on what to sell. It was early on in our relationship and they were somewhat new at choosing products to sell. Plus, who’s gonna really listen to some old pool installer wearing a stained shirt to work every day.
Despite my advice to make sure to buy quality skimmers that have been made for a while, they chose to buy like a thousand of some new skimmer no one has ever heard of. I’m sure these skimmers were like four bucks cheaper than a good Hayward made one, so they jumped all over it.
At the beginning of pool season, I noticed this cheap skimmer and installed it on my first pool install of the year for them. Two days later, I get a callback. The skimmer was leaking. This happens, so I went out and discovered that this cheap skimmer doesn’t fit right. And the biggest problem with this is you really won’t know if these skimmers will seal or not until the pool is filled with water.
A week later, I got two more callbacks for leaking skimmers. This is not good for me. To get three callbacks in two weeks is just not something that I tolerate as I usually only get five or six callbacks per entire season for everything. I then decided that I wasn’t going to pay the price for someone else’s poor decision, so I told those guys that I didn’t want to install their piece of garbage skimmer, and that if I did, they would have to go back and fix them if they leaked. They agreed as there aren’t many pool installers and I’m the best.
A month later, they brought in good skimmers to replace the crappy ones that were four bucks cheaper. They took a real bath having to go back and fix all of those leaks. They also learned that you have to have a good skimmer to go with your above ground pool package.
MY FAVORITE SKIMMERS
Although all above ground pool skimmers aren’t as good as they used to be (yeah, like everything), some are most certainly better than others. On top of the list right now are skimmers made by Waterway.
Waterway skimmers are currently my favorite. They are made in America with better materials, don’t have to be assembled on-site, come with good gaskets and decent screws, and fit most above-ground wall openings well. Waterway skimmers are also the most expensive skimmer, so that might tell you something when considering who offers it with their pool package.
Coming in second place is skimmers made by Hayward. Across the board, Hayward products are not what they used to be as most of their stuff is now made cheaper and in China, but they are still better than most.
There are a couple of other names that have been around for a while that make skimmers, but they fall away from these top two. Swimline skimmers are acceptable, but some of their gaskets are questionable.
STEP BY STEP INSTRUCTIONS FOR FIXING A LEAKING SKIMMER IN AN ABOVE GROUND SWIMMING POOL
Above ground pool skimmers leak for different reasons. These instructions should work for all situations.
1 Verify the leak – Check using a towel – Before spending any energy on this at all, it’s very important to make sure the skimmer is actually leaking.
I know that to anyone other than a repair guy of some kind, this sounds stupid. This wouldn’t be so dumb sounding if you’ve made as many appointments as I have to go out and fix something that wasn’t broken. And let me tell you – stupid is something you feel when you have to pay a guy like me for a service call on something that’s doesn’t need fixing.
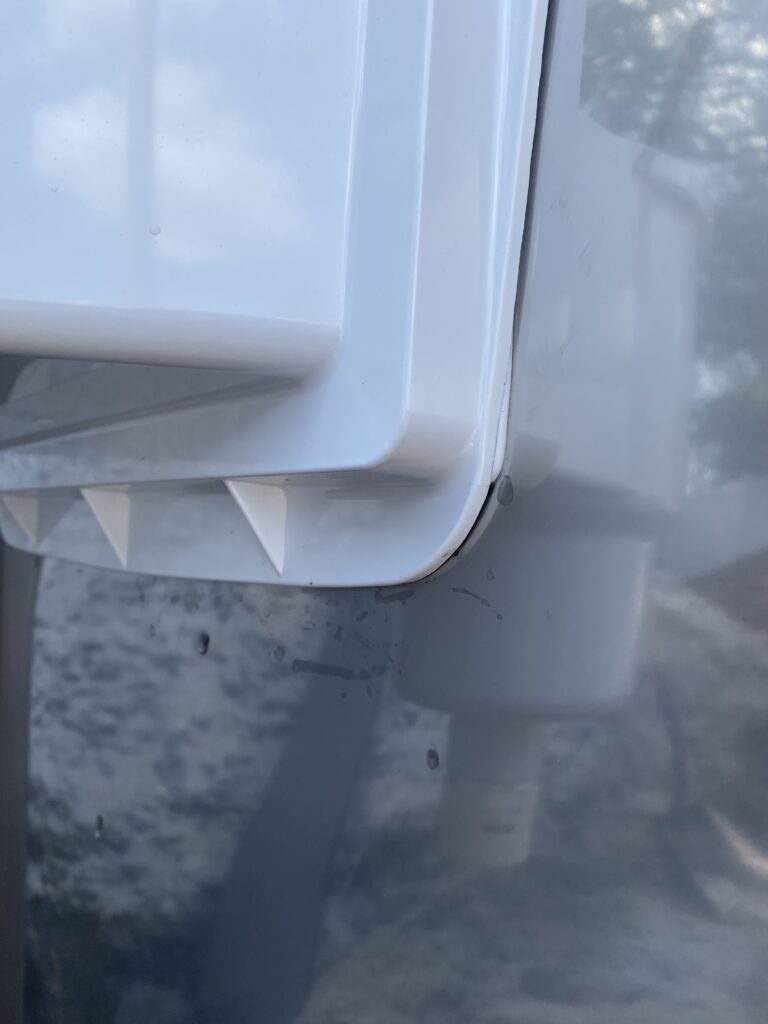
Using a clean, dry towel, very closely inspect the outside of the skimmer for wetness. Wipe the moisture away and see exactly where it’s coming from. This will help to determine why it’s leaking and how best to fix it.
Knowitall note – It’s common for a skimmer to look like it is leaking, but the water is actually coming from the pool’s level being too high and spilling over and around the skimmer box from the top.
A skimmer leak is almost always where the plastic skimmer meets the metal wall. With this, you will see water traveling down the pool wall.
If the skimmer is leaking away from the wall though, then that’s either a bad seal with the gaskets between the widemouth and round piece(usually), or the skimmer body is cracked(very rare).
2 Tighten the screws, especially where it is leaking – A skimmer attaches to the pool’s wall using screws from the inside of the pool. You can see these screws all around the skimmer opening. For a wide-mouth (the most common), there are 18 screws and for a square skimmer, there are 10.
These screws should be really tight. When installing a skimmer, I use a cordless drill, but always use a quality manual screwdriver to finish. This way, I can get the screws perfectly tight.
There is a thing called “too tight”. If you crank those screws too much, they will strip as they are only held in a plastic casing. But you do want them very tight.
Often times, you can stop the skimmer from leaking by just tightening the screws. Some skimmers with questionable gaskets will need to have very tight screws. This is the easiest fix, so try this first. It may be all you need to do.
3 Inspect the outside gasket – Identify any areas that look uneven or twisted – It’s important for the outside gasket to be visible and straight all around where the skimmer meets the wall.
If there’s an area where the gasket is sticking out less than the other places or you can’t see it at all, then that may be where the problem is. Pay attention to any questionable gasket areas in later steps when the skimmer comes off.
4 Lower the water level to just below the skimmer – When trying to fix a skimmer leak, you don’t want to have to deal with water spilling everywhere. Take the extra step of lowering the pool’s water level so you can work dry.
5 Remove the skimmer – Take off all the screws and completely remove the skimmer from the wall. Note: As long as the pool is full of water, you don’t have to worry about the liner. It won’t move and the holes in the liner will stay in position.
6 inspect the wall – Clean any materials with a razor knife or scraper – With the skimmer out of the way, remove the gasket/s and take a look at the wall of the pool where the holes are and the gaskets go.
Clean away anything that is on that area. Any old pieces of gasket, old liner, silicone, plumber’s putty, or any other thing someone thought should be used to help seal the skimmer. Use a scraper or razor knife if you need to. Be careful not to cut yourself while doing this. I have many times.
Note: Skimmers are designed to attach to above ground pool walls using only gaskets. The use of silicone, putty, or any kind of sealant is entirely unnecessary and often causes leaks.
7 If the gaskets are old, replace – In most cases when doing a liner changeout, I won’t need to replace the skimmer gaskets as the old one/s will usually re-seal well. But if your skimmer is leaking, don’t play around with trying to make old stuff work. Just get brand new gaskets so you can have a better chance for success.
8 If the gaskets are not sitting well, replace them with paper gaskets – Not all gaskets are made well or made with good materials. And not all skimmers are made well or line up well. This can result in the gaskets not laying flat around where you need them to.
If your gaskets (even if brand new) are acting up, then I recommend replacing them with paper type gaskets. Paper gaskets aren’t better, but they are more rigid and are designed to expand when wet. This could make the difference between getting a seal and not when dealing with a questionable situation.
9 Re-install the skimmer box – Now that you have a clean wall surface and gaskets are new or at least in good condition, it’s time to re-attach the skimmer.
Knowitall tip – It’s ideal to use two people to install the skimmer. One on the outside of the pool to hold the skimmer box in place and one in the pool to line up the gaskets and screw on the faceplate to the skimmer.
Certainly, one person can install a skimmer to an above ground pool. But if the skimmer was leaking beforehand, you’ll want to make sure everything goes together straight. If only one person is available to do the job, then at least position yourself inside the pool and install the skimmer from the front.
10 If the screws are stripping, Replace them with slightly bigger stainless screws or replace the skimmer – Many times when replacing a used skimmer during a re-liner job, I will find that a couple of the screw holes are stripped. This is usually ok and the skimmer will still have a perfect seal.
Your skimmer was leaking beforehand though. This means you want to fix anything questionable. And skimmer screws not being able to tighten is most definitely questionable and can be the cause of the leak.
There are two options here – you can take one of your skimmer screws to a hardware store and find the exact screw, only a little fatter. This new, fatter screw will be able to bite into the skimmer and you’ll be able to tighten it. Make damn sure the replacement screw is made of stainless steel. Anything else on the pool can rust and later, you won’t be able to take it off the pool’s wall.
The other option here is to get a whole new skimmer. A new skimmer will come with everything brand new, so nothing will be questionable and the screws will be tight. I recommend this.
11 If the skimmer doesn’t line up well, replace with a Waterway or Hayward skimmer – If, while re-installing your skimmer, you notice that the holes don’t really line up that good, then you could have a super cheap, Chinese skimmer that wasn’t made to good enough specs. A guy like me with a ton of experience can probably make it work. For a pool owner though, maybe not.
In this case, let’s say you’ve tried a couple of times, and you can’t get it to not leak. My advice at that point is to replace it with a skimmer you know is good. Order a Waterway or Hayward skimmer and install that instead.
Your pool may be down a couple more days, but it will be worth it when the thing doesn’t leak anymore.
12 Test the re-installed skimmer – Now that your done, fill the pool back up and check your work. Look very closely to make sure it’s not leaking anymore. You just went through this ordeal, so it would be disheartening if it still leaked a little.
But don’t let it leak even a little. A little wall leak can destroy the entire pool in as little as a year or two. Make sure it’s no longer leaking, at all.
13 If still leaking, replace the skimmer – If you are still leaking and haven’t already replaced the skimmer, then yes, it’s time to bite the bullet and get a new one. A brand new skimmer usually solves the problem. Usually.
14 Use 100% silicone (Not Recommended) – Occasionally, there are instances where you have to go beyond the normal design. Some skimmers won’t stop leaking for different reasons. Sometimes there’s rust on the walls around the skimmer opening. Sometimes the gaskets and/or the skimmer is poor and disallowing a good seal.
Admittedly, I have used silicone to seal above ground pool skimmers. When I was much younger and more concerned with time than quality, I made choices like that. In truth, I haven’t used silicone on a skimmer in several years, but I would if I needed to.
First off, don’t use silicone(or anything else) around the outside of the skimmer. Outside sealing usually doesn’t work or the fix doesn’t last. If you’re gonna use it, then at least use it correctly.
Take the skimmer completely off. Run a small but even bead of 100% silicone on the wall side of each gasket. You don’t want to use so much of it that it squishes out everywhere and makes a big mess.
Note: Use 100% silicone only. The label should say for bathrooms and kitchens. Other sealants may work well. They may not, too. Don’t screw around. Use the good stuff.
Re-install the skimmer using the faceplate, gasket/s, screws, and skimmer box in all the correct ways explained above. The only difference here will be that you ran two beads of silicone at the wall on the inside of the gaskets.
The silicone will fill in any thicker spots in the seal area and you’ll be good. It’s important to install the silicone evenly all around the opening. If you don’t do it right, it’ll just make a mess and the skimmer will still leak.
would i get dirt comming from skminner if put on wrong
I don’t think so. The skimmer is high of the ground. How can dirt come out of it?
Please let me know if you’re looking for a article author for your site. You have some really great posts and I believe I would be a good asset. If you ever want to take some of the load off, I’d absolutely love to write some material for your blog in exchange for a link back to mine. Please shoot me an e-mail if interested. Cheers!
Thank you. I might do that
I have a wide-mouth above ground skimmer that has some minor leaks. It has a butterfly gasket (new). Have you ever used a single gasket on top of the butterfly gasket (on the outside of the wall) so you in effect have a double thickness gasket? I’m thinking that might help.
Two gaskets are never better than one. Solid things have no seal. When you have to put two things together, a seal has to be made so nothing leaks between the openings. Usually, for each gasket, two seals have to be made (One on each side of the gasket). If you add a gasket, you are now adding two more seals, which is creating two more places that water can leak.
If your skimmer is still leaking despite the fact that you put a new one piece (butterfly) gasket on it, then the gasket is either set wrong (not showing all the way around), the screws aren’t tight enough, it’s a cheap, crappy gasket, or it’s a cheap Chinese made skimmer that doesn’t fit well with the wall opening.
My advice to you (if you have a good skimmer) is to replace the one piece gasket with two paper-type gaskets. Paper gaskets tend to seal less than ideal openings as they will expand when wet.
Thanks for the great advice. The skimmer is a Swimline Widemouth – it’s what the local pool store sells. It fits the wall opening perfectly. I’m pretty sure the gasket is set right, however, its outside dimensions are not equal to or larger than the skimmer and face plate. So it’s not really possible for the gasket to show all the way around unless I stretch it somehow. Anyway, it sounds like I have a crappy cheapo gasket. Where can I find these paper gaskets? Are they the same as cork? Do all widemouth skimmers have a universal mounting pattern? Sorry for all the questions – I really appreciate you providing a service like this!
I don’t know where to get paper gaskets other than something like Amazon. Not the same as cork. And yes, 99% of all widemouth skimmers have the same pattern(not counting original Doughboy skimmers).
Hello Dan,
You stated that skimmer should be “flat” against the wall. Problem. I have an oval pool, skimmer placement was only to rounded ends. So, skimmer does not lay flat against rounded wall. When skimmer is tightened (faceplate inside pool to throat of outside piece it causes slight deformation of wall.
Second, I am having continued problems with leaks coming from small mouth gasket that is screwed to wide mouth adapter on outside. I too, used cordless drill to snug all of the screws up, alternating sides, when tightening..till none of the screws could move. Still leaking. This is a Hayward product (second skimmer) and RxClear (first skimmer.) Both look identical except for logo stuff. Both have silicone U shaped double gaskets. BTW, the faceplate inside pool and adapter that is screwed to on outside fit well through manufacturer’s pre-cut rectangular opening; however, the U-shaped gasket is too small in width, by mere mm’s and the end will not go around faceplate edge. Any suggestions?
I’m not sure if I have this in the article, but when I attach the widemouth portion to the square skimmer, I run a bead of 100% silicone on both sides of that square double gasket. This ensures that I don’t have a leak between the two pieces. Oh and I tighten the 8 round head screws pretty damn tight. the silicone oozes out some.
We have some small screw holes in our skimmer (above ground pool) that were caused by using the wrong screws to tighten the skimmer after removing a winterizing plate. We are in the process of opening the pool for the season, and haven’t run the filter yet. We havent seen any leaks yet. What is the best way to avoid leaks in a situation like this? We thought about using putty made for pools.
Holes in the plastic faceplate? Yes. I would use 2 part epoxy I think
Hi there! I have a wide mouth skimmer on my above ground pool. This is my 2nd skimmer, the 1st skimmer had cracks in the bottom part that screws into the skimmer box for the hose to connect to. Pool store guys came out and replaced the skimmer and the water inlet (was leaking as well) last month. That was a $340 charge (they added a aquador as well). Two days later and they both start leaking again. The water inlet going back into the pool, has a slow drip where the hose clamps on. I can’t seem to get that to stop dripping. The skimmer started leaking where the hose is clamped at the bottom of the skimmer body. Then yesterday I noticed it was leaking just above that where the skimmer body screws together with the PVC piece for the hose to connect. The pool store said to use their silicone gel on the PVC piece’s before sliding on the hoses. I did that, it helped them slide on but didn’t stop them from leaking. I’m so frustrated at this point. Can you help? How do I keep it from leaking where the flexible hoses attach to the skimmer and water inlet? I even bought new hoses and that didn’t help.
When it’s leaking at the hose clamp, the first thing I try is to add a second hose clamp. If that doesn’t work, then I take the hose off, scuff up the cone fitting, then replace (this scuffing up allows the hose to grip better). If that doesn’t work, then I try a different cone fitting. Some are better than others.
I can almost always get the hose to stop leaking by doing the above. If you can’t though, then I recommend you get the pool store back out and have them replace the hoses with PVC.
I will give that a try! Thank you so much.
By far the best article on AGP skimmer leaks that I have found.
My initial install of the Hayward widemouth skimmer leaked. I just replaced the gasket following the above tips, but it still leaks. I can see gasket material poking out between the skimmer and wall on the sides, but not the top and bottom. The faceplate has an inner lip that covers the gasket and I cannot figure out how to poke the gasket out.
Have you ever used the Swimline Wall Saver gasket (model 89463)? It seems to be wider and have more material for the faceplate and/or skimmer to bite into.
https://hydrotoolsparts.com/products/wall-saver-universal-set
I have not, however it looks like it’s made with vinyl liner material So I think it will be too thin for any questionable skimmer. I recommend a paper-type gasket. They are usually bigger, so you can see them too.