Has your above ground pool pump stopped working? It actually pretty common. The second thing that most commonly has to be replaced with an above-ground swimming pool is the motor for the pump. (The first thing is the plastic flex hoses)

Your pool can only be a year old and the pump can go out. This is, unfortunately, a common occurrence because a pool pump is run by an electric motor. And electric motors will sometimes only last a year. I’ll explain later why this happens.
What is Wrong with my Pool Pump? FIRST – DO THESE 2 THINGS
Doing these two things first will help you diagnose the pump issue much better.
Clean Area Around the Pool Pump
You want clear and clean access to the pump and its surroundings. Remove weeds, grass, and any dirt build-up under and around the pump.
This is in no way a waste of time as you will need to clean this area if you have to replace the pump or motor anyway.
Inspect the Electrical
Start with the back of the pump and work your way to the breaker in the electric box. Inspect all connections making sure everything looks clean and is well connected.
Inspect the connection where the pump cord goes into the receptacle, any timer connections, GFI and the breaker (at the electric box), and all wires that you can access.
Make a note of anything that looks loose, off-color, or burnt from excess heat.
QUESTIONS TO HELP DIAGNOSE THE PROBLEM WITH YOUR ABOVE GROUND POOL PUMP
NOTE: This article does not apply entirely to pumps that come with soft-sided pools made by Intex, Coleman, or Bestway. Soft-sided pools come with their own brand of equipment, are very cheaply made, and are only designed to be replaced instead of repaired.
Answering these questions will help you pinpoint the cause of the problem with your pool pump motor.
1) How old is the pump?
Typically, the electric motor attached to the pump lasts five years on average. If your pump is approaching beyond five years old, then set your expectations for a replacement.
2) Is it making any noise?
A common sign that the motor is about to go is when it starts getting louder and louder. This is usually the motor bearings failing but other noises can mean other things.
3) Is the water moving in it at all?
When you look through the clear pump basket lid, do you see any water moving? Is there only some water moving? Is the pump trap (where the basket is) full of water, but no water is moving to the pool?
In most cases, if there’s any water moving at all, then you can rule out any electrical issues. That’s most cases but not all.
4) Is the electric breaker tripping?
The electric connection to your pump is connected to one of the breakers in your home’s electric box. If it keeps “tripping”, then that means there’s an electric issue associated with the pump or the electric feed.
5) Is the GFI tripping?
The ground fault circuit interrupter or GFI or GFCI is like a mini-breaker just for the pump’s electric line. This can be more sensitive than the breaker in the electric box.
The GFI is usually built into the receptacle that you plug your pump into. There will be two buttons in-between the outlets. One tests or “trips” the GFI and the other resets it.
6) How do you have the pump connected to the electric supply?
When it comes to above-ground swimming pools, how people run electricity to their pumps varies greatly.
AG pool pumps are often run with simple extension cords plugged into a pre-existing outdoor outlet. In many cases, this is where the problem is.
7) Do you see any water leaking anywhere?
Most of the time, a water leak is not associated with pump failure, but there are a couple of cases when they relate.
Water leaks should always be fixed instead of leaving them, so researching this is a good idea anyway.
POOL PUMP ISSUES ARE EITHER ELECTRICAL RELATED OR WATER FLOW RELATED
Now that you have (hopefully) answered the above questions, you should be able to assume whether your pump issue is electric-related or water flow-related.
It’s important to know which one of these is the cause of your pump’s problem. This gets you to narrow down the cause.
COMMON ELECTRICAL ISSUES WITH AN ABOVE GROUND POOL PUMP
Electrical issues are more common than water flow issues, so I will list these first.
- A Power surge from the electrical grid or lightning
- Poor or loose wire connection. This can be anywhere a connection is made including where the wires connect to the pump motor (back of the pump), a receptacle to plug, a receptacle to wire feed, timer connections, any junction box connections, or at the electric panel
- Insects, bugs, or lizards getting fried at a connection
- Micro power surges over a long period of time (This can take life out of some components of the pump motor)
- Starting capacitor of the pump motor failing
- Extension cord used for the connection is too small and burns up
- GFI fails and needs replacing
- Breaker in panel fails and needs replacing
- Exposed wire severed from trauma (like from a weed-eater or shovel)
- Motor bearings failing from age or failed water seal
- Timer failed and needs replacing (both in-line and plug-in type)
USING A VOLTMETER IS THE BEST WAY TO DIAGNOSE AN ELECTRICAL ISSUE WITH A POOL PUMP
So if you are reading this, there’s a good chance you will be attempting to fix your pump issue yourself. My hope then is that you know how to use a “voltmeter”
If you don’t know how to use one, it’s not really that hard and simple voltmeters don’t cost much. So if you are planning on being a DIYer, then getting one and knowing how to use it will come in handy for many other electric-related fixes around the house too.
COMMON SENSE NOTE: When using a voltmeter, you are checking to see if there is electricity running through the wires. This means there will be times when you have to “work hot” or check wires that have electricity running through them. This then means that if you touch these lines, then they can shock you or shock and burn up any tools made of metal that touch.
Always be very safe when dealing with electricity. Take your time and be careful with what you and your tools touch. And if you are afraid of electricity, then good. You should be. If it’s too much for you to deal with, then don’t do it. Call a friend or electrician instead of DIYing this.
The electrical issue with your pool’s pump is going to be somewhere between where the power comes from (the electric panel) and the back of the pump (where it connects to the motor).
The best end to start with is where the electricity has to go to run the pump. So, you’ll start by checking the back of the pump motor where the wires connect to it. Most above-ground pool pumps run at 120 volts, so this is the voltage that you want to check for. Make sure any switches, GFIs, and the breaker are on first.
If the back of the pump motor is not receiving 120 volts, then that tells you there is a problem somewhere closer to the power source (electric panel). Now check the next connection. This is usually where the pump cord plugs into the receptacle. If there is NOT good (120v) power there, then you have to check further down the electric line until you find where there’s power.
Check anywhere in the line where there is a connection. If you have thoroughly inspected the electrical (step 2 of above “getting started”), then you will know of all the electric connections along the path to the power source.
You may not have power even coming out of the breaker in the power panel. This will be mean that the breaker itself is faulty and needs replacing.
Once you find out where the power has stopped, then you know what needs to be fixed. There is some applicable common sense here. If there’s power before a connection, then that means whatever comes directly after that needs to be replaced or fixed.
When you have fixed the problem, check the connection behind the pump motor to make sure you now have good 120v power. If you still don’t have it, then re-trace the line again to see what the new issue is and fix it.
COMMON WATER-RELATED ISSUES WITH ABOVE GROUND PUMPS
- Pool water level too low
- Air leak before the pump
- Partially or fully clogged impeller
- Broken impeller
- Air leak between pump and pump trap
- Broken or stuck valve before the pump
- Partially or fully clogged filter
- Broken or stuck valve after the filter
- Motor’s bearings failing due to leakage between pump and motor (failed pump seal)
- Pump basket lid is not tight, cracked, or needs a new o-ring
STEPS TO FIGURING OUT WHAT THE WATER FLOW ISSUE IS WITH THE PUMP
For 35 years and counting, I’ve been dealing with water flow. Diagnosing a flow or leak problem is not easy. Some will think it’s easy, but that only means they don’t have a lot of experience and got lucky with some water diagnostics in the beginning.
Treat finding out the flow issues of a pool pump with respect, because if you don’t, your ego will prevent you from success. This is experience talking here. Take nothing for granted.
The following steps are very specific. Skipping any of them may result in you not figuring out the issue. OK, so now that you have been warned twice, here you go.
1) Easiest first – Turn on the pump.
If it’s pumping fine but making a loud noise and is getting louder every day, then that is the bearings in the pump motor failing.
The pump seal (a ceramic ring that prevents the water from leaking from the pump back to the electric motor) has most likely failed. Over time, this leaking water damages the bearings of the motor and then they start making noise.
This noise gets louder and louder until the bearings finally completely fail. This can take a week or a few months.
The pump motor needs to be replaced. Replace it instead of letting someone talk you into just replacing bearings.
2) Make sure there is enough water in the pool
Fill the pool to at least three-quarters of the skimmer face opening.
3) With the high water level, turn on the pump and inspect the flow in the skimmer. Check to make sure the floating weir isn’t stuck
Warning: A stuck floating weir will prevent enough water to flow to the pump. This is a very common and very simple fix. DON’T SKIP THIS STEP A floating weir is the hard plastic flap that is connected to the front of the skimmer and is supposed to draw downward to allow water to flow into the skimmer.
4) Remove the pump trap basket lid
Inspect the o-ring of the lid. If dry, lubricate. If it has stretched too big, replace it with a new one.
5) Remove the skimmer basket and inspect the line at the bottom of the skimmer box
Make sure it’s not clogged up. If clogged, then clean out the get a new skimmer basket. (Now, how did I know it was broken or cracked? lol)
6) With the pump on, check the hose or PVC line from the skimmer bottom to the front of the pump
Check the fitting under the skimmer, the fitting in front of the pump, and the valve (if you have one) in-line. Listen for any “hissing”.
NOTE: If your pump is below the level of your pool, then check for water leaking out of these areas too.
7) Bypass the filter
If you have a sand filter, move the top valve to “recirculate” or “waste”. A cartridge type filter, then open, remove the filter element, and replace the lid. If a D.E. filter, set up to waste.
What you are doing here is bypassing the filter. This takes away any restriction that your filter may have on the flow of the water. If a filter is clogged or broken, then it can restrict the flow of water to the point where the pump cannot move any or just a little water.
Now, turn on the pump. If you are now getting a lot of flow, then your problem is a filter restriction.
8) Check the valve (if you have one) in the line going back to the pool
It may be stuck or broken and you may not know it. If it looks bad, has a broken handle, or is extremely hard to turn, then you may want to replace it just in case. It’s most likely not it, but you never know PLUS if it’s in poor shape, replace it for other reasons.
ADVANCED DIAGNOSIS
If the above steps didn’t help you figure out the flow issue with your pump, then it’s time to get to the impeller of the pool.
Depending on the pump that you have, it may be easy or it may be hard to get to the impeller.
NOTE: The impeller is the part within the pump that turns and moves (displaces) the water. This is the most important part of a pump.
Most impellers for better quality above-ground pool pumps can be accessed by removing the pump trap. This is the part that holds the basket with the clear lid. Removing the trap will expose the front of the impeller.
WARNING: KEEP THE PUMP TURNED OFF WHEN EXPOSING AND INSPECTING THE IMPELLER
The impeller is directly after the pump trap, so depending on the pump, you’ll have to remove the trap in whatever way it comes off. This can be tricky, so if it looks beyond your comfort level, don’t do it.
When you access the impeller, you may just see the front of it. Inspect it closely. It should be completely free of any debris. If there is even some debris(leaves, twigs, etc.), then that can restrict the flow of water.
Use a small screwdriver or piece of wire to remove all debris from the impeller.
Also, inspect the impeller to see if it’s cracked or broken. If it is, then you may not be able to get the part. You may have to replace the entire pump. In-ground pumps have impellers that can be replaced. Most above-ground pumps cannot.
If clogged, clean, replace the trap, and turn the pump on. Hopefully, it will pump fully now.
REPLACING THE PUMP OR MOTOR
If you have done the diagnosis and decided that the motor/pump has to be replaced, then the first step is seeing if only the motor can be replaced. For most above-ground pumps, it’s better and easier to replace the entire pump instead of just the motor.
Warning: I don’t recommend you DIY a motor replacement. Replacing the motor requires installing a new shaft seal, which can be tricky. And if not set right, the seal will leak and the motor’s bearings won’t last long.
Fortunately, if you are doing this repair yourself, it’s easier to replace the whole pump for an above-ground pool than just the motor. And it can cost about the same too, so that’s good.
FINDING A REPLACEMENT PUMP FOR YOUR ABOVE GROUND POOL

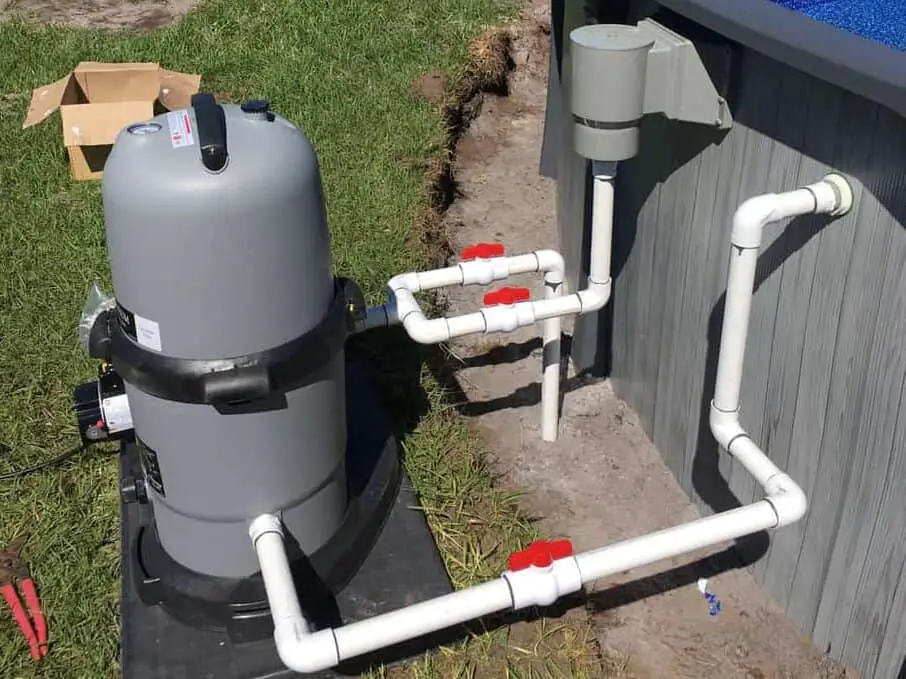
It’s easier to find replacements for pumps or motors for inground pools. Above-ground pool pumps can be tough. This is because the pumps are specific to the “equipment pack” that came with your pool. The equipment pack is the pump, filter, base, and connections/fittings.
The pump with your filter pack will have a specific way it connects to the filter. This means you’ll need an exact match.
Start with contacting where you bought the above-ground pool. Some stores (both online and brick and mortar) will be able to sell you a replacement pump. Some will not.
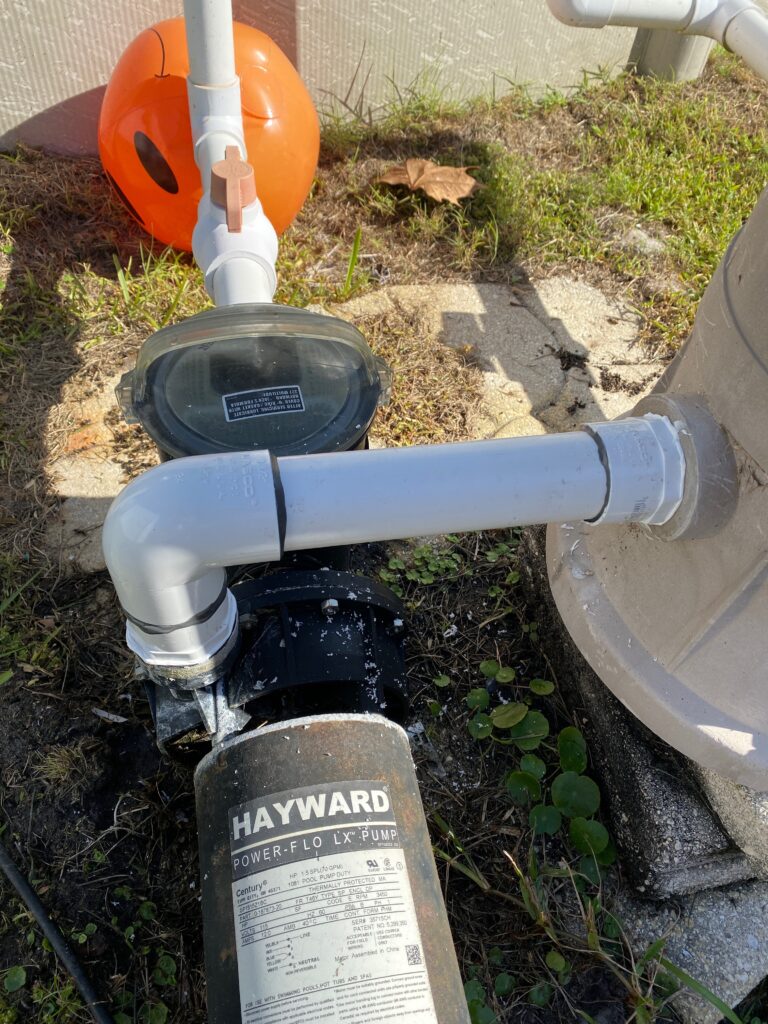
Next, check online. Take a pic of the pump and find one that looks exactly like it. This is easier than it used to be. Better quality AG pumps made by either Waterway, Hayward, or Pentair are easier to find replacements for.
Warning: Most pool stores will not have replacement pumps for above-ground pools AND don’t offer to replace them or their motors.
You can try your local pool store. Odds are they cannot help you UNLESS they carry above-ground pools and parts.
FOUND THE REPLACEMENT PUMP AND REPLACING YOURSELF? THIS IS HOW
1) Turn off the valves blocking the water from the pool
If no valves, plug the skimmer and return or drain the pool below the return line.
2) Disconnect the electrical
This can be as easy as unplugging it from the receptacle. If hard wired into a junction box or timer, you will have to remove the wires from it.
The new AG pump will come with a standard cord with a 3-prong plug attached. If what you have now was hard-wired, then you will have to do some wiring.
NOTE: Above-ground pumps made in the US will have only a three-foot long cord. Overseas pumps have six-foot cords. This means that if replacing a Chinese pump with a US-made one, you may not have enough length with the new cord. With this, you will remove the existing six-foot cord and install it onto your new
pump.
3) Remove the old pump
Disconnect what is needed to remove the pump. Some pumps are easily removed by just removing two quick disconnect fittings (one connecting the pump trap and one connecting the filter).
Note: If you are lucky enough to have any quick disconnects, try to purchase new o-rings/gaskets for them if you can.
Some require cutting PVC piping in from the pump and going to the filter. Whatever needs to be removed to get the thing free, remove it.
Most pumps will be attached in some way to the equipment base. Waterway brand is nice in that it just has plastic pins accessible from the top. Others are bolted to the base from the bottom.
The bolted pumps can be a pain to get out as you have to access them from underneath the base. This is why I never bolt pumps to their base. I only screw them down with self-taping screws. I recommend you do the same with the new pump.
4) Install the new pump
Since you took the old one off, you now know what it’s going to take to re-attach it. If just the two quick disconnects, then it will be easy.
If you had to cut pipe, then you’ll have to take off any “screw in” fittings and re-silicone them to the new pump or trap.
Expert Tip: If you have to connect threaded fittings, use 100% top-quality silicone made for kitchens and baths. You only want to do this once.
5) Wait for everything to dry then turn on
If you had to glue or silicone any fittings, then wait an hour before turning on. You don’t have to wait that long, but doing so will make sure everything is dry and sealed.
Open the lines to the pool and turn on the pump. Inspect all areas involved with the replacement. If something is wrong or leaking, then now is the time to address it.
Keep a close eye on things for the next week just to make sure everything is good. Nice job, well done!!


